Here is a neat video. Host Rudy Winston, Canon technical advisor of renowned fame, explains how Auto Focus woorks on Canon cameras.
Join Rudy Winston, a Technical Advisor in the Product Planning Dept. for Canon USA, and me as we take a deep dive into the amazing auto-focus systems available in the current line of Canon cameras, on this Behind the Shot.
It seems the noise reduction on the Canon EOS R3 can not be turned off.
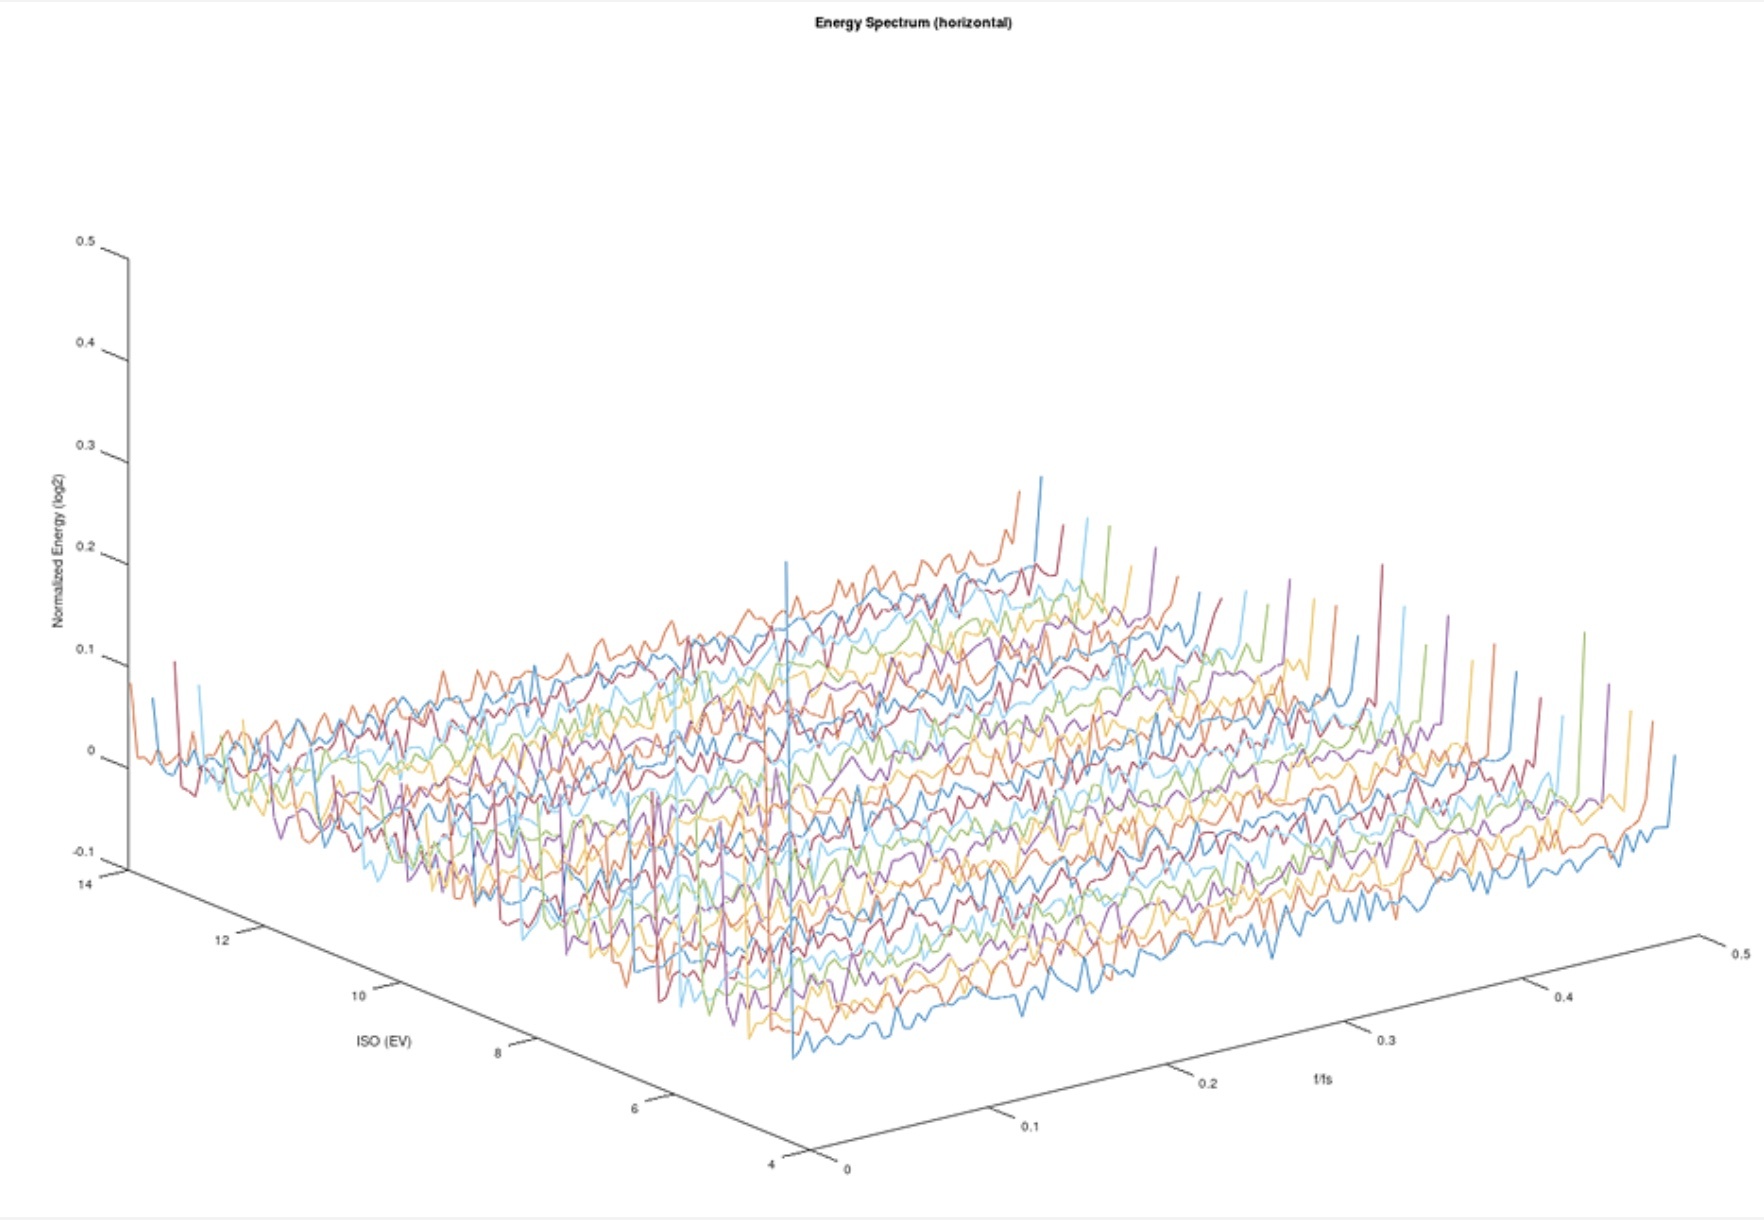
Based on sensor data collected by Photons to Photos, asobinet.com suggests the noise reduction on the Canon EOS R3 can not be turned off. They compared sensor data form the Leica M11 vs the Canon EOS R3. The image below is for the Leica M11, the image on top refers to the Canon EOS R3. Both images show the energy spectrum at all ISO settings. You can clearly see that the M11 sensor data is flat while the sensor data for the EOS R3 shows some prominent signal processing applied. According to asobinet, the signal processing is noise reduction.
Got an old Canon lens catching dust and are you into DIY hacks? Then this is for you. This is some serious hardware hacking.
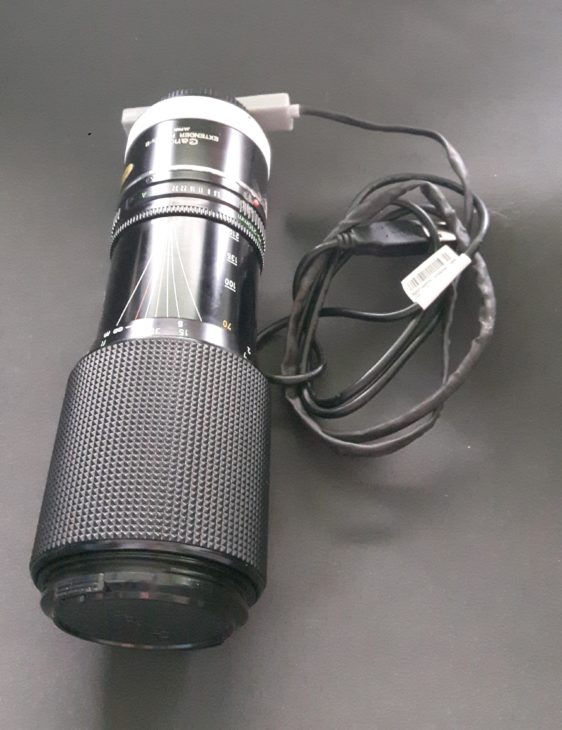
A guy going by [Ad_w00000] on Instructables made a soldering magnifier using a Canon SLR zoom lens, the FD 70-210mm f/4, and the Canon Extender FD 2X-B.
[Ad_w00000] says:
Soldering was becoming more difficult for me and magnifying glasses weren’t much help. I saw on the net that someone used a zoom lens from cctv camera and attached it to a webcam. I didn’t have a cctv zoom lens. But I did have an SLR zoom lens! I liked the idea that there is alot of space between the lens and object. Space to work on. So I started this project. Besides I have lots of goodies lying around in my office and its getting more cluttered and now I got to use them up!
The whole thing is pretty complex and involves for sure some skills. For the Canon part of things, [Ad_w00000] took the lens out of the FD 2X-B extender. This allows to take off or change the lens without hassle. A recycled laptop webcam was fitted into a hole drilled into a Canon rear lens cap. Lens cap and lens mounted on the adapter.
The Canon FD 70-210mm f/4, with extender and mounted webcam (image courtesy of [Ad_w00000])
Curious? See everything explained step by step by [Ad_w00000] at Instructables. The story was spotted by hackaday. More Canon hacks are listed here.
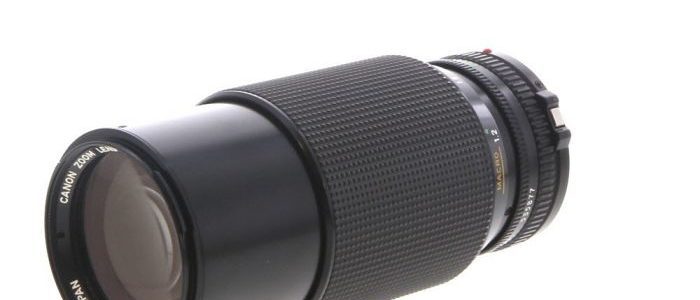
If you want to learn more about this Canon vintage lens, check the video below by Mark Holtze.
Canon published a technical article about the world’s first 1-megapixel SPAD image sensor. A groundbreaking image sensor and distance measurement sensor that will be the eyes of the future.
The advanced technology discussed in the Canon article is for applications involving augmented and virtual reality, ultra-high frames-per-second shooting speeds, robot automation, computer vision, and driverless vehicles. Here are some excerpts from the article:
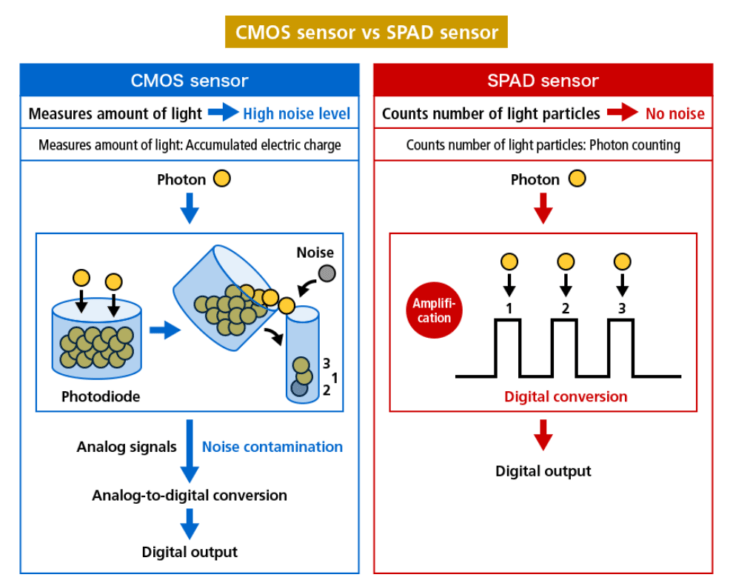
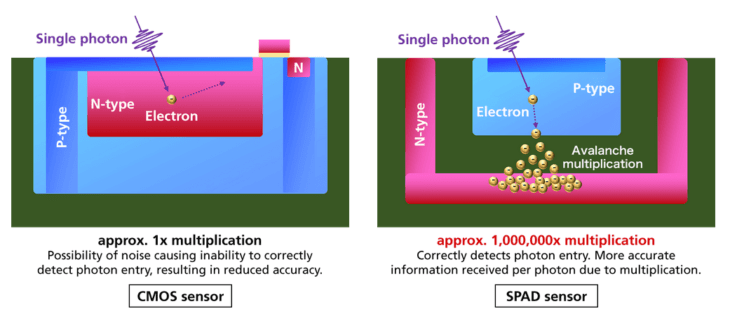
Both SPAD and CMOS sensors make use of the fact that light is made up of particles. However, with CMOS sensors, each pixel measures the amount of light that reaches the pixel within a given time, whereas SPAD sensors measure each individual light particle (i.e., photon) that reaches the pixel. Each photon that enters the pixel immediately gets converted into an electric charge, and the electrons that result are eventually multiplied like an avalanche until they form a large signal charge that can be extracted.
[…] it was considered difficult to create a high-pixel-count SPAD sensor. On each pixel, the sensing site (surface area available for detecting incoming light as signals) was already small. Making the pixels smaller so that more pixels could be incorporated in the image sensor would cause the sensing sites to become even smaller, in turn resulting in very little light entering the sensor, which would also be a big problem.[…] Canon incorporated a proprietary structural design that used technologies cultivated through production of commercial-use CMOS sensors. This design successfully kept the aperture rate at 100% regardless of the pixel size, making it possible to capture all light that entered without any leakage, even if the number of pixels was increased. The result was the achievement of an unprecedented 1,000,000-pixel SPAD sensor.
Canon sees many applications for their new and revolutionary image sensor:
In the fields of AR (augmented reality) and VR (virtual reality), which involve superimposing virtual images on top of real ones, being able to use the SPAD sensor to speedily obtain accurate three-dimensional spatial information enables more precise alignment of positions in real time. There are also high expectations for the application of SPAD sensors in solving one of the greatest challenges in designing driverless vehicles: the measurement of distances between a vehicle and the people and objects in its vicinity.
The article is very interesting and if you are into these technologies we recommend you give the article a try. The whole thing was spotted by Image Sensors World. More tech stuff is listed here.
Lens focus breathing. Ever heard about? According to Wikipedia:
[Lens] Breathing refers to the shifting of angle of view of a lens when changing the focus. Some (often higher quality) lenses are designed to lessen the degree of this effect. Lens breathing does not prevent one from racking focus or following focus with this lens, but it lessens the desirability of any type of focus adjustment, since it noticeably changes the composition of the shot. This is not to be confused with the suction and expulsion of air from within the lens as its internal volume changes.
Here is a incredibly cool Canon EOS R5 hack, performed by a very talented guy with solid engineering skills (take this as a warning: don’t do it at home).
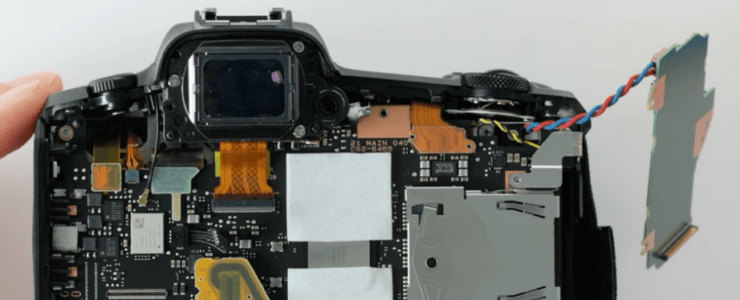
The guys behind DIY Perks have disassembled a Canon EOS R5 and applied a water-cooling system to the camera’s motherboard. Unlimited 8K recording time is achieved, no more overheating. However, the water-cooling hack as neat as it is, is a gimmick. These guys did far better.
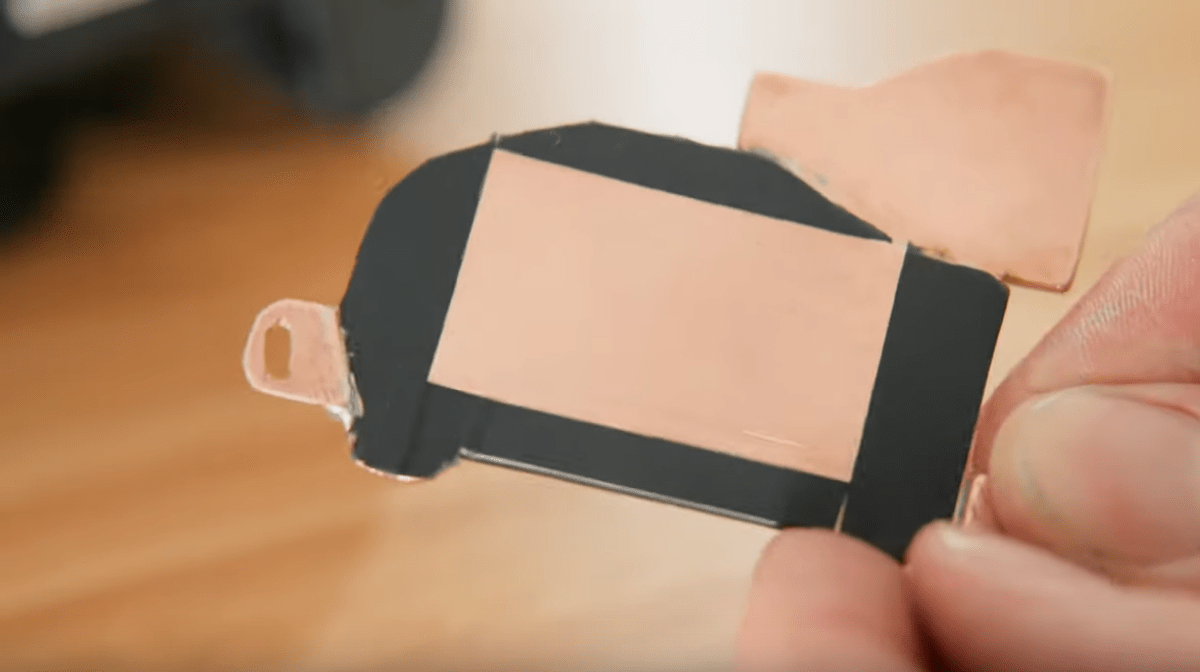
Since a water cooled EOS R5 would be rather impractically out in the field, DIY Perks came up with a better idea and did some serious thermal engineering. They custom-made a copper heat sink and applied it with thermal paste (not thermal tape) to the CPU and DRAM chips on the camera’s motherboard. In environments that are not too hot this allows for continuous video recording without impairing the handling of the EOS R5. A small fan can be applied to the back of the R5 when it is used in warmer places. A professional looking solution that works.
Carefully crafted, this is the copper plate
The copper plate does the magic
The video below shows all steps and is very interesting. Kudos to the guys at DIY Perks.
This website or its third-party tools use cookies, which are necessary to its functioning and required to achieve the purposes illustrated in the cookie policy. If you want to know more or withdraw your consent to all or some of the cookies, please refer to the cookie policy. By closing this banner you agree to the use of cookies.