How To Make an Easy and Simple Timelapse Controller for Canon DSLRs using Arduino

Arduino

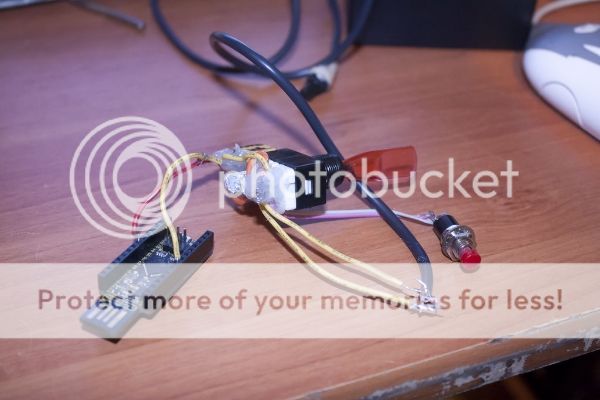
Arduino is an open-source electronics prototyping platform, a single-board microcontroller you can use for small projects, like this one. Instructables user  aidanjarosgrilli posted the instruction for a simple and easy timelapse controller for your Canon DSLR, the how to is here. You need:

  • Arduino
  • 3v relay
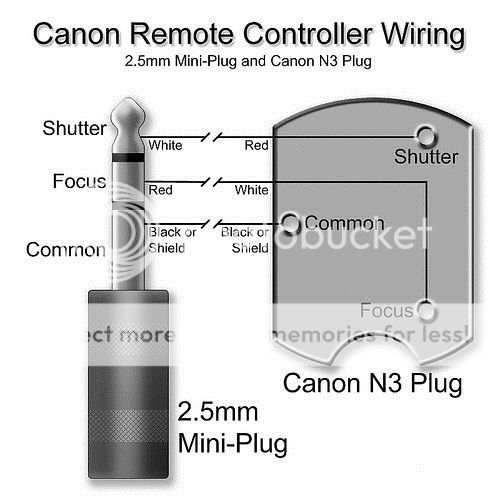
  • a remote plug for your camera
  • a 4x AA battery pack
  • switches/buttons (optional)

Nice week-end project. :)

Arduino

Canon Starts Canon EOS 101 Tutorial Series for Beginning Photographers

The Canon Digital Learning Center (DLC) startes a series of tutorials for those who are new to photography.

Learn photography and videography basics in our Canon EOS 101 series where we delve into shooting modes, auto focus, file types and more. Whether you’re new to shooting photos or videos or just brushing up on skills, these tutorials for our Canon Live Learning students or entry level imagemakers range from setup to post production and offer tips on how to utilize the features of your EOS camera.

There are 13 videos that cover all aspects you would like to learn to progress in your photographic skills. And, hey!, it’s free.

[via The Phoblographer]

The Basics of Time Lapse Photography with Vincent Laforet (Setting Up The Camera)

Explorer of Light Vincent Laforet explains the basics of time lapse photography. Travel with him from the rugged canyons of Utah to the Las Vegas Strip, and learn how to make your own unique time lapse movies. In this episode, review camera setting to optimize your EOS system for shooting time lapse sequences, including Vincent’s tips on camera features to enable or disable, shooting in Manual Mode, the benefits of shooting in the RAW format, and more.

Watch the full series of Time Lapse tutorials on the Canon Digital Learning Center.

Magic Lantern And Free Lensing Using Focus Peaking

What is free lensing? Put simply: a way to replicate the tilt-shift look without using a tilt shift lens. Basically, you detach the lens from the body, hold it out and tilt the lens up or down or left or right, get focus and snap the picture. This is feasible if your camera features focus peaking. Canon’s do not but the firmware add-on Magic Lantern does. Magic Lantern is something each serious Canon shooter should consider to install on hers or his DSLR (click here to see which Canon DSLRs are supported). Be aware not to drop your precious lens while doing free lensing :-)

The video below is a free lensing introduction and tutorial.

[via fstoppers]

DIY: Make A Canon Video Remote For Less Than $10

Easy to follow how to for a DIY video remote for Canon DSLR cameras for under 10 bucks. If you have a Canon digital camera and plan to shot video using a camera rig, then you’ll want a good way to control your recordings with a start/stop button. A remote control is the way to go, but you can save a lot of money if you make your own! The remote in the video is hardwired into the camera and onto the rig for easy handling. You need: a Canon RC-6 remote control (click here) or a generic brand (click here), a fiber optics cable (click here), a wire hanger, some gaffers tape, and a Leatherman multi-tool (click here). Everything is exemplified on a Canon EOS 5D Mark II (price & specs) but it works with other Canon DSLRs too. You may want to jumo over the first minutes of the video.

[NextWaveG via wonderhowto]