“NYC Layer-Lapse” is an amazing display of New York City (and shot with Canon gear)

Layer-lapse

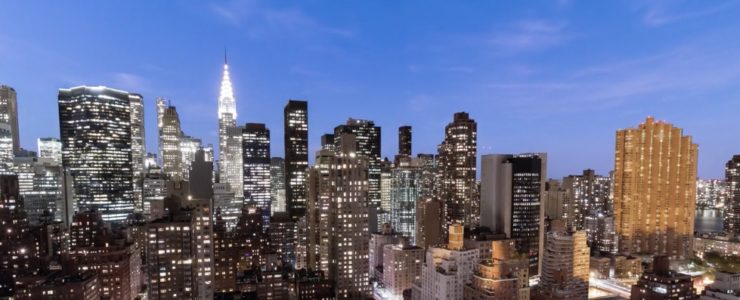
We featured other works by time-lapse photographer Julian Tryba in the last years. Tryba’s latest effort is a layer-lapse of New York City, NYC Layer-Lapse.

You may wonder what a “layer-lapse” is. Julian Tryba describes it as follows:

Traditional time-lapses are constrained by the idea that there is a single universal clock. In the spirit of Einstein’s relativity theory, layer-lapses assign distinct clocks to any number of objects or regions in a scene. Each of these clocks may start at any point in time, and tick at any rate. The result is a visual time dilation effect known as layer-lapse.

You have to watch the video to grasp the idea entirely.

To realize NYC Layer-Lapse Julian Tryba made 22 trips to New York, spent 352 hours filming, paid $1,430 in Parking Fees, drove 9,988 miles, and took 232,000 pictures. As you can see this is way more than a weekend project. He used five Canon DSLRs (Canon EOS 5Ds, EOS 5D Mark III, EOS 5D Mark II, EOS 6D, EOS 7D), a Sony A7rii, and a bunch of lenses (Canon 200-400mm, Canon 100-400mm ii, Canon 70-200mm 2.8 ii, Canon 16-35mm 2.8 ii, Canon 24mm f1.4 ii, Canon 24-70mm 2.8 ii, Zeiss T* 50mm 1.4, Canon 135mm f2, Sony G 16-35mm 2.8, Canon 24-105mm, Rokinon 20mm 1.8).

NYC Layer-Lapse is not your usual time-lapse clip, it is a work of art born from passion and hours of work. More about how it was made can be read here. Kudos!

“Pulse” is a beautiful black & white time-lapse of storms, monsoons and supercells

Mike Olbinski

I featured works by Mike Olbinski previously (1 | 2 | 3), beautiful time-lapse movies of storms, tornados, thunderstorms, you name it. He’s a storm chaser and he makes outstanding time-lapses.

This time we feature Pulse (4k), a black and white time-lapse of monsoons and supercell. Says Mike Olbinski:

For quite a few years now I’ve been wanting to do something different with my time-lapse films. I love color. Storms are full of color. The blues, the greens, the warm oranges and reds at sunset. The colors are sometimes what make a simple storm into something extra special.

But black and white speaks to my soul. I love it. There is something when you remove the color that lets you truly see the textures, movement and emotion of a storm.

All shots were captured with a Canon EOS 5Ds R, EOS 5D Mark III, and EF 11-24mm, Ef 16-35, 35mm, 50mm and 135mm lenses. Processed using Lightroom, LR Timelapse, After Effects and Premiere Pro. You can follow Mike Olbinski on his site, and on TwitterFacebook, and Instagram.

The ultimate crash course on night time-lapse photography (30min video)

time-lapse

Have you ever wanted to shoot a cool time-lapse but were afraid of the complexities of the task? Here is the 30 minutes crash course on time-lapse that you’ve waiting for.

Photographer Mark Gee shows you how to tackle the various tasks, like planning, setting up, shooting, post processing and exporting.

In this Star Timelapse tutorial you’ll learn how to setup a motion control timelapse using the Syrp Genie and Magic Carpet. This guide to Astro Timelapse covers everything from location scouting to camera setup and includes a detailed section on post production using Adobe Lightroom and LR Timelapse.

The tutorial goes beyond the software and the gear used by Mark Gee. Btw, he used a EOS 6D and Canon 14mm L lens. Enjoy:

In the field:

0:49 – Location Scouting – Mobile Apps | Composition
3:03 – Camera setup – Image Quality | Shutter | Aperture | ISO | Focus
4:33 – How to avoid star trailing
5:27 – Setup the Genie – Rec Time | Interval | Play Time
6:29 – How the interval works
7:43 – Setup the movement – Movement length | Ease in / out

Post Production:

8:20 – Introduction and workflow setup
10:32 – Color adjustments and neutralising the image
11:32 – Lens Correction
12:20 – Set black and white points
13:20 – Color adjustment – Clarity | Tone Curve
16:30 – Local Sky Adjustments – Graduated Ramp
19:37 – Technical Clean-up – Noise Reduction | Artifact clean up
22:47 – Sync color adjustments to all images
24:22 – Export all images to LR Timelapse
26:08 – Export out a movie from LR Timelapse – Codec | Output size

[via DIY Photography via Mark Gee]